Ever since finding 40K as a game (came over from Lord of the Rings) I have loved the Tau models and way of fighting, meaning shoot the other guy to pieces hopefully before he chops your head off in close combat. There is a little bit of a thrill there for me. I finally got my hands on some Tau tanks, a devilfish and a hammerhead, and went down to the game store to get some games in. Granted you can't play a game with two models, but I was able to borrow some from a friend there who has more models than just about any 10 of the other 40k'ers at the store. I believe he is about 1 company from having the whole Ultramarines chapter in models. Yes, I said chapter, all the companies, vehicles, Thunderhawks, Titans, everything. It adds up to over 22,000 points of Ultramarines. And I might be a little jealous.
Anyways, he has some other armies as well, and he lent me some of his Tau to field an army. Taking loads of inspiration from the Warhammer Tau blog, which is an incredibly well done blog imo, I built up a list to go against a buddy named Scott, nicknamed Satan, and his new IG army. Now Scott has a reputation for ruthless armies that are tough to beat, and a reputation as a great commander. He rarely loses I imagine, because I have never seen it happen.
We did a 1500 point game, and my list was as follows.
Shas'el - MP/PR Multi, Targeting, and 2x shield drones
2x Bodygaurd with MP/PR Multi-tracker and Targeting array
3x 6-man Firewarrior squads
2x Devilfish SMS, Burst cannon, multi-tracker, targeting array, and pods
2x Railheads with SMS, multi-tracker, target lock, pods
3 man Broadside team with team leader, 2x shield drones targeting array, and target lock and targeting arrays on the other 2
3 man Crisis Team with TL flamer/fusion blaster and multi-tracker and target lock on the team leader.
(I hope that all adds up, the tau codex isn't at hand and I may be off in the counting. I was never good at maths)
Scott had an IG army with this list as best as I can remember.
Command squad with banner and medi-pack and a sage
4x Vet squads with lascannon and some plasma weapons as well
2 colossus artillery guns. s:6 ap:3 ignore cover, pinning (terrible weapon go go up against, ouch is all I have to say)
Inquisitor with 2 sages and 2 mystics I believe and a MM gun servitor (kinda unsure on retinue)
The chem-weapon tank with heavy flamer
Callidus Assassin
and that is it I believe.
Now a couple of thoughts about his army. Some people may wonder about the Inquisitor and retinue, but most of us know that the guard are horrible against assault, and that is one of their main weaknesses. Well, the retinue allows the Inquisitor to gain a free shot on any deep striking unit within 4d6 of the inquisitor. Not too bad you might think, but the second mystic or sage or whatever retinue guy it was allows him to nominate another unit or squad within 12 inches to take that shot. Now that is nasty. Try to deep strike in a Dreadnought, he gets a free multi-melta to your face, rerolling hits from his retinue. Bring a squad of infantry, he rams a Colossus shell down your throat. It really makes deep-striking close to his army a very bad decision. And all the vets get +1 to their normal cover saves, so when they go to ground it is a 2+ invul save. Not so bad when he can then order them up the next round and fire back at you on a roll of 10 or below. So with that in mind I'll move right along.
We drew spearhead deployment with annihilation and he won the dice roll and chose to deploy and go first. We were playing in a cityscape type board with lots of ruins and 2 buildings on each side, so there was some cover and narrowing of firing lanes. He deployed mostly in cover. Two vet squads and the command squad in a ruin in his corner, on vet squad in a building on the midline of the board, one on the ground in cover from my corner behind said building and his Inquisitor in the open between the ruins and the building, with one colossus by each of the terrain pieces. He put his banewolf i think it's called next to the center to bum rush me with a scout move and flame all my models. He kept the assassin in reserve of course. With that he said, "Deploy" and I said, "Ok. I'm done. Go ahead." I held everything in reserve.(thanks Warhammer Tau ;)) He was shocked of course and hadn't seen anything like it before. He questioned me on that and said it couldn't be done, so I showed him the rules and he said ok.
Round 1
He did his scout move for the flamer tank and ran in into my deployment zone, and was done. So was I.
Round 2
He ran the tank even further into my zone driving into my ruins to try to deny them to me. Also because of his sage in the command squad he got a +1 to all reserve rolls, and his assassin landed in the same ruins, and lost the nasty ability of moving one of my units where ever he wanted.
My turn consisted of only the lone squad of foot-slogging firewarriors coming on the board because of his sage that also gave my reserve rolls -1. They really had nowhere to go so I put them in rapid fire range of the Assassin in cover and blasted her. Only 1 wound unfortunately.
Round 3
This turn started with his tank flaming my firewarriors and killing all of them. I knew it was going to happen, so no problem. His turn was over.
My half I finally got some units on the board, namely my broadsides, a Railhead, and one devilfish. No suits yet. My railhead then shot his tank from behind at point-blank and blew it to pieces, and the ensuing explosion killed his assassin. Sweet revenge!
Round 4
He started really opening up on me at this turn. All those lascannons came to bear and with his orders that allow him to reroll misses I was in trouble. He hit me each time, 2 on each tank, and I managed to fail all my cover saves from the pods. Go figure. He blew my devilfish apart, then landed a colossus shell that killed all but one of the firewarriors that tumbled out of the wreckage. The lascannons failed to hurt my railhead fortunately and another colossus shell put one wound on my broadside team, no big deal.
The bottom half of the turn seemed wasted to me, but it helped in the end. I felt I wasted my railgun submunition shots on his vet squads, because he just sent them to ground for the 2+ save. I killed maybe 3 or 4 of his vets and maybe one or two models from his inquisitor retinue, but I felt my railguns were not being effective. My broadsides let off some shots and got maybe one or two more of the retinue. It wasn't until I realized he had to waste his orders on getting his men back up, and not on rerolling his las shots that I began trying to template as many squads as I could to try to get him to drop multiple squads and waste his orders.
Round 5
This round he failed to get one of his squads back up, which was lucky for me, and he used all the other orders he had to stand up the rest of his squads, so no rerolling! He managed to scatter his colossus shells off the table, and his las shots amounted to a can't shoot on my devilfish. No harm done.
On my turn I finally got in my command suit squad and the second devilfish. I fired everything I had at him, aiming to put to ground as many squads as possible. I finished off the retinue, and put a wound on his inquisitor, took out some of the command squad and maybe a few more vets scattered through the 4 squads. It didn't seem too productive, but it was better than his turn. At this point we rolled and continued on into turn 6.
Round 6
This turn he really put the hurt on me because I wasn't paying attention. I had moved all my suits out into the open behind a devilfish screen, but what I didn't know was the rules on the Colossus firing. He then turned his tanks to get direct shots at me to lessen his scattering. That's what you get for being new to the game I guess. He then put a template right on top of my flamer suits and wounded all of them. And here was my bigger mistake. I thought they were all instant kills and removed the whole squad from the board, not thinking that only one model had to go, with a wound one other. Stupid me. In the end I might have been able to pull out the win had I not done that. All of his other shooting was ineffectual, except he did get an immobilised roll on one of my hammerheads. But no worries, he wasn't going to be going anywhere anyways.
Bottom of the round I tried to template his command squad out of the game for the kill points. I took it below half, but didn't manage to kill it outright. I also managed to put a railgun slug into the back of the head of the retreating inquisitor. That was a satisfying experience. And at this point the game ended on the die roll.
I thought it was going to be a close game in kill points. My shop plays by the 4th ed. kill points rules for some reason or another, so we had to count up the point values of what we had lost. In the end I came up about 90 points ahead, so it was a draw, but a major moral victory for me. Had I not removed that whole crisis suit squad I think I would have had the win, but oh well, rookie mistake. Next time I don't plan on pulling a draw with him, I think I can beat that list. A little more practice with my army and I will be ready.
On a side note, Scott got a nasty idea for a reserved guard army with two sages in the command squad. Having everything that was reserved come in on a 2+ on turn two is kind of ridiculous, and rerolling his outflanking rolls puts him on whatever board edge he wants for the most part. Now that is an army I don't ever want to go up against. I don't know the guard codex well at all, but I imagine rolling all your Leman Russ ranks on turn 2, countering the opponents deployment, and firing the battle cannon and lascannon is a recipe for destruction. I am anxiously waiting to see what kind of list he turns out, as long as I don't have to face it. He is a creative guy.
I hope that didn't run so long as to make it boring, but as it is my first batrep, I will have to maybe condense a bit for the future, and take some pics of course. Its hard to do without a fully painted army, but what can you do. Any and all comments are appreciated, I would love some constructive criticism from some of the veteran Tau players out there. Until next time!
Saturday, June 20, 2009

Friday, June 12, 2009
Some Finished Products
So, it’s been awhile since I posted here, and now it’s time to get back on the blogging bandwagon. I got my land raider finished, and I am quite pleased with it, turned out pretty good.


One problem I did have was the paint on the top of the hull. Above the treads was really hard to get even. I was trying multiple coats of thin paint, but it only seemed to be getting worse, and so I then tried a thick coat. It seemed to cover a bit better, but there are still some ugly lumps and bumps up there. Anyone have any ideas on how to get a smooth coat of paint on a larger surface like that? I don’t ever have this problem painting on the small marines, but this tank was a whole different process. I’m at a loss, so any ideas or tips would be helpful.
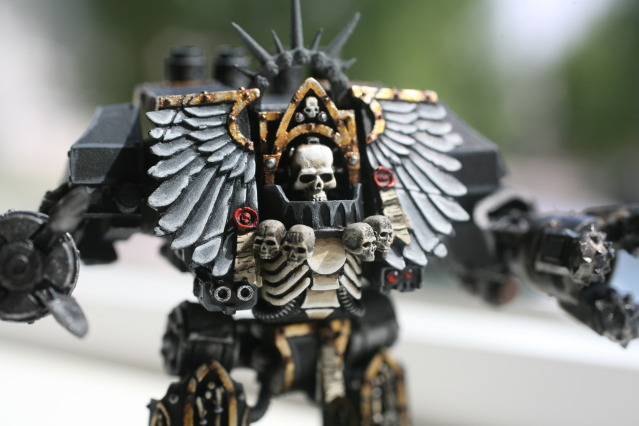
Here is my next project I have mostly finished (I think most all of my models are in that stage actually . . .) I just need to get his halo painted up, think I will do a golden halo with metallic silver skulls, not quite sure. But here is my Forgeworld “Death Company Furioso” ‘Dread. He’s my pride and joy, I was really happy with how he turned out. Took me awhile to do the shading and blending, but the model was worth the time spent on it. It is the centerpiece of my Blood Angels Army, although it has yet to have a real impact in a game. Go figure.


One problem I did have was the paint on the top of the hull. Above the treads was really hard to get even. I was trying multiple coats of thin paint, but it only seemed to be getting worse, and so I then tried a thick coat. It seemed to cover a bit better, but there are still some ugly lumps and bumps up there. Anyone have any ideas on how to get a smooth coat of paint on a larger surface like that? I don’t ever have this problem painting on the small marines, but this tank was a whole different process. I’m at a loss, so any ideas or tips would be helpful.
Here is my next project I have mostly finished (I think most all of my models are in that stage actually . . .) I just need to get his halo painted up, think I will do a golden halo with metallic silver skulls, not quite sure. But here is my Forgeworld “Death Company Furioso” ‘Dread. He’s my pride and joy, I was really happy with how he turned out. Took me awhile to do the shading and blending, but the model was worth the time spent on it. It is the centerpiece of my Blood Angels Army, although it has yet to have a real impact in a game. Go figure.


Monday, March 30, 2009
How to Magnetize your Land Raider Redeemer/Crusader

As soon as I saw this model I knew I wanted to get one! I saw the rules for the flamestorm cannon and knew it would be great to roast all the local marine armies at the local game store. But then I started reading posts about how well the hurricane bolters were doing for people in their games so I couldn't decide on which variant to use. I found some guides on how to magnetize but I found some of them hard to follow. I'm no engineer and I would have liked more info/pictures to help me along. So I thought I'd try to do one, with more pictures and hopefully easier to follow insturctions. So here we go!
The first thing I did was take an inventory of all my peices to see how they fit together. I did a lot of dry fitting to see how the pieces interacted and how they could be put together best. I had magnetized a Baal Predator already (will post some pics of that soon) and thought about doing it the same way. I had put magnets just under the optical device at the top of the strut so I could switch the flamers out for the heavy bolters, and that worked well, but the LR was built just a bit differently. The bottom support threw me for a loop. That's when I decided to glue down the optical device on the LR and just change out the weapons right off the strut. So I went right for it.
Here's some of the dry fitting I did, it may have been one of the more important steps in the whole process.

I first started by priming all the gun bits. Some people like to prime on the sprue, but I hate having the marks left over after you cut off the pieces. Here's all the pieces laid out in my priming box. Do one side, let dry, then flip them over for the other side. Really easy.

After the priming was done, it was time to start all the drilling on the bits. I started with the struts. I whittled down the cylindrical hubs that would normally hold the guns until they were flat.


(original shape) (after cutting)
I next drilled through the part that held the hubs. I used a 1/8th inch drill bit because I learned on my Baal Predator that GW likes the 1/8th measurement. I ordered the magnets in the 1/8th by 1/16th and they fit gorgeously into all the places I have needed to magnetize. I would suggest getting this size magnet for what you have to do, they are plenty strong to boot. They hold my all metal flamers quite well on the side of my Baal pred.


(drilling through) (call me cheap, but who needs a pin-vise?)

Finished product x2
At this point I glued the magnets into the struts. They are the most important magnets, because most of the direction of the other magnets will be determined by the polarity of these two guys. One note of caution is to let the superglue dry completely before you let these get near any other magnets. The magnets are so strong that they will fly together when close, and they can become glued together. That is bad. Also, when the glue is dry, you can then make sure your polarity of the other magnets is correct by testing them against the originals in the struts.
Next I took the drill bit to the gun pieces to widen the holes a bit so the magnets would slide in easier.


After the strut magnets had dried I tested the polarity and then glued the magnets into the 4 different guns.

Next it was time to figure out how to attach the outer armor panels. I had a hard time figuring this part out, and truth be told it turned out worse than I had really wanted. But, it did turn out acceptable. The armor plates stick out a bit too much, but I am ok with it.
I began by drilling into the inner tabs on the plates themselves. Because they are so thin it was kind of difficult. So I used my exacto to cut out the pieces that they drill refused to get.


That let perfect sized sockets to help hold the magnet in place. It gives the joint a bit more strenght than just gluing the magnet right onto the flat of the armor panel. The guns got the drill bit next, to allow for a magnet to sit on the outside and attach to the armor panel.

After that I just had to glue magnets into all those new areas and I was ready to move on.
I hope that was helpful and was easier to follow, with the pictures being somewhat helpful. I wish I had a more detailed version before I began, but the ones I did find did help me along the way.
Also, check out K&J Magnetics. These guys are awesome. Fast shipping and killer prices. Right now they have these same sized magnets for $3.00 for only 100 of them. Killer deal, you really can't beat it anywhere else. The link is on the side, just go to the surplus page and the 3 mm by 1.5 mm are the ones you want. Who knows how long they will be at that price?
As I get further along with this project I will post more pictures. There is always something else to do right? But I am anxious to get this tank done and painted, it is going to wow them at the local club!
Tuesday, March 24, 2009
Boards have passed, but did I?
So my national boards exams are over, and now the waiting begins to see what how I did. It should be another month before I know, and the waiting is going to possibly kill me.
But on to happier things. I should now have some time to spend on some of my hobbies, but more importantly with my family.
I finally got back to do some painting. One work in progress is the dreadnought in the banner at the top. I converted him from the plastic dread from the AoBR box set. I wanted a death company dread, and I had no real way of finding a right-hand CCW, other than Forgeworld of course. I took the left hand from one and put it on the right hand side. It was some fairly simple cutting, and in the end and I was pleased with the results. I'm glad my first one went pretty well, it will keep me trying later when I have other good ideas.
Here's some other pictures of it. It is mostly done with painting, but it needs to be based and there are some more final touches it needs.

Friday, February 6, 2009
The First Post
This will be far from exciting to say the least, but you have to start somewhere right? And don't pay any attention to all the lame eye puns, that's just what optometry nerds do. I apologize up front.
I'm not exactly sure where I want to take this whole blog thing, into my studies/work of optometry (I'll graduate 2010) or into my hobbies, chief of which is miniature wargames. I did Lord of the Rings tabletop wargame and am now into Warhammer 40,000. I enjoy the painting and modeling most, but I like to play also. I rarely get the chance to do either given my shedule, but its a good diversion from what consumes my life otherwise.
Odds are this blog will be a ghost town until after mid-March, when my national board exam is over, then I will have plenty of time to do what I enjoy more. I also need to get a decent camera to photograph some of my minis. That will come soon enough hopefully.
I'm not exactly sure where I want to take this whole blog thing, into my studies/work of optometry (I'll graduate 2010) or into my hobbies, chief of which is miniature wargames. I did Lord of the Rings tabletop wargame and am now into Warhammer 40,000. I enjoy the painting and modeling most, but I like to play also. I rarely get the chance to do either given my shedule, but its a good diversion from what consumes my life otherwise.
Odds are this blog will be a ghost town until after mid-March, when my national board exam is over, then I will have plenty of time to do what I enjoy more. I also need to get a decent camera to photograph some of my minis. That will come soon enough hopefully.
Subscribe to:
Posts (Atom)